3.6. Configuring Fence Devices
Configuring fence devices for the cluster consists of selecting one or more fence devices and specifying fence-device-dependent parameters (for example, name, IP address, login, and password).
To configure fence devices, follow these steps:
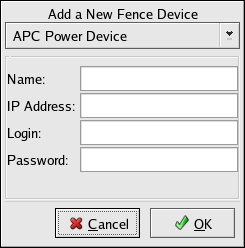
Click Fence Devices. At the bottom of the right frame (labeled Properties), click the Add a Fence Device button. Clicking Add a Fence Device causes the Fence Device Configuration dialog box to be displayed (refer to Figure 3-6).
At the Fence Device Configuration dialog box, click the drop-down box under Add a New Fence Device and select the type of fence device to configure.
Specify the information in the Fence Device Configuration dialog box according to the type of fence device. Refer to the following tables for more information.
Field Description Name A name for the APC device connected to the cluster. IP Address The IP address assigned to the device. Login The login name used to access the device. Password The password used to authenticate the connection to the device. Table 3-1. Configuring an APC Fence Device
Field Description Name A name for the Brocade device connected to the cluster. IP Address The IP address assigned to the device. Login The login name used to access the device. Password The password used to authenticate the connection to the device. Table 3-2. Configuring a Brocade Fibre Channel Switch
Field Description IP Address The IP address assigned to the PAP console. Login The login name used to access the PAP console. Password The password used to authenticate the connection to the PAP console. Table 3-3. Configuring a Bull Platform Administration Processor (PAP) Interface
Field Description Name The name assigned to the DRAC. IP Address The IP address assigned to the DRAC. Login The login name used to access the DRAC. Password The password used to authenticate the connection to the DRAC. Table 3-4. Configuring a Dell Remote Access Controller/Modular Chassis (DRAC/MC) Interface
Field Description Name A name for the BladeFrame device connected to the cluster. CServer The hostname (and optionally the username in the form of username@hostname) assigned to the device. Refer to the fence_egenera(8) man page. Table 3-5. Configuring an Egenera BladeFrame
Field Description Name A name for the GNBD device used to fence the cluster. Note that the GFS server must be accessed via GNBD for cluster node fencing support. Server The hostname of each GNBD to disable. For multiple hostnames, separate each hostname with a space. Table 3-6. Configuring a Global Network Block Device (GNBD) fencing agent
Field Description Name A name for the server with HP iLO support. Login The login name used to access the device. Password The password used to authenticate the connection to the device. Hostname The hostname assigned to the device. Table 3-7. Configuring an HP Integrated Lights Out (iLO) card
Field Description Name A name for the IBM Bladecenter device connected to the cluster. IP Address The IP address assigned to the device. Login The login name used to access the device. Password The password used to authenticate the connection to the device. Table 3-8. Configuring an IBM Blade Center that Supports Telnet
Field Description Name A name for the RSA device connected to the cluster. IP Address The IP address assigned to the device. Login The login name used to access the device. Password The password used to authenticate the connection to the device. Table 3-9. Configuring an IBM Remote Supervisor Adapter II (RSA II)
Field Description IP Address The IP address assigned to the IPMI port. Login The login name of a user capable of issuing power on/off commands to the given IPMI port. Password The password used to authenticate the connection to the IPMI port. Table 3-10. Configuring an Intelligent Platform Management Interface (IPMI)
Field Description Name A name to assign the Manual fencing agent. Refer to fence_manual(8) for more information. Table 3-11. Configuring Manual Fencing

Note Manual fencing is not supported for production environments.
Field Description Name A name for the McData device connected to the cluster. IP Address The IP address assigned to the device. Login The login name used to access the device. Password The password used to authenticate the connection to the device. Table 3-12. Configuring a McData Fibre Channel Switch
Field Description Name A name for the WTI RPS-10 power switch connected to the cluster. Device The device the switch is connected to on the controlling host (for example, /dev/ttys2). Port The switch outlet number. Table 3-13. Configuring an RPS-10 Power Switch (two-node clusters only)
Field Description Name A name for the SANBox2 device connected to the cluster. IP Address The IP address assigned to the device. Login The login name used to access the device. Password The password used to authenticate the connection to the device. Table 3-14. Configuring a QLogic SANBox2 Switch
Click OK.
Choose File => Save to save the changes to the cluster configuration.
