Chapter 13. LVM Configuration
LVM can be configured during the graphical installation process or during a kickstart installation. You can use the utilities from the lvm package to create your LVM configuration, but these instructions focus on using Disk Druid during installation to complete this task.
Read Chapter 4 Logical Volume Manager (LVM) first to learn about LVM. An overview of the steps required to configure LVM:
Create physical volumes from the hard drives.
Create volume groups from the physical volumes.
Create logical volumes from the volume groups and assign the logical volumes mount points.
 | Note |
|---|---|
You can only edit LVM volume groups in GUI installation mode. In text installation mode, you can assign mount points to existing logical volumes. |
To create a logical volume group with logical volumes during installation:
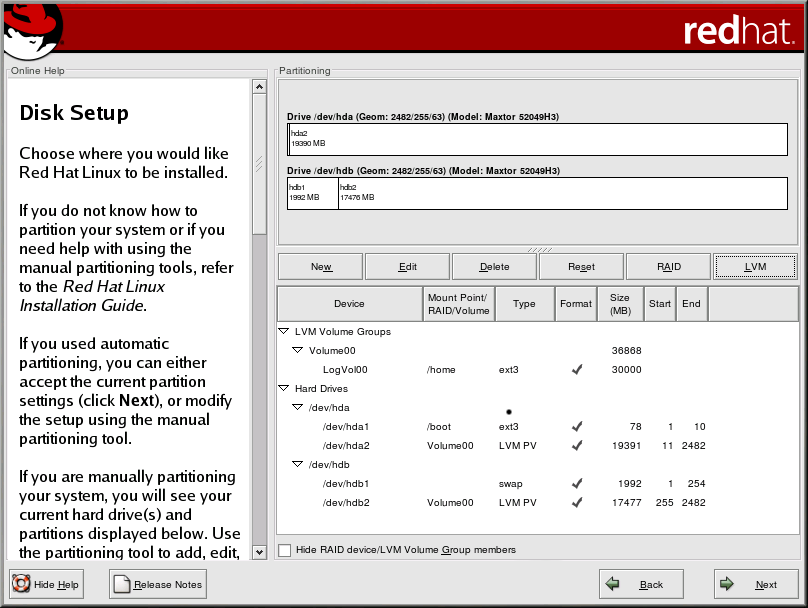
On the Disk Partitioning Setup screen, select Manually partition with Disk Druid.
Select New.
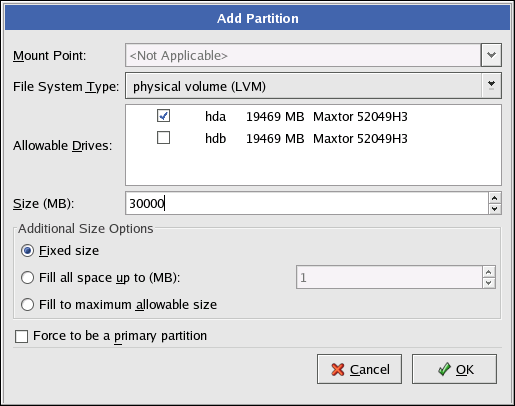
Select physical volume (LVM) from the File System Type pulldown menu as shown in Figure 13-1.
You will not be able to enter a mount point (you will be able to do that once you have created your volume group).
A physical volume must be constrained to one drive. For Allowable Drives, select the drive on which the physical volume will be created. If you have multiple drives, all drives will be selected, and you must deselect all but one drive.
Enter the size that you want the physical volume to be.
Select Fixed size to make the physical volume the specified size, select Fill all space up to (MB) and enter a size in MBs to give range for the physical volume size, or select Fill to maximum allowable size to make it grow to fill all available space on the hard disk. If you make more than one growable, they will share the available free space on the disk.
Select Force to be a primary partition if you want the partition to be a primary partition.
Click OK to return to the main screen.
Repeat these step to create as many physical volumes as needed for your LVM setup. For example, if you want the volume group to span over more than one drive, create a physical volume on each of the drives.
 | Warning |
|---|---|
The /boot partition can not be on a volume group because the boot loader can not read it. If you want to have your root partition on a logical volume, you will need to create a separate /boot partition which is not a part of a volume group. |
Once all the physical volumes are created, follow these steps:
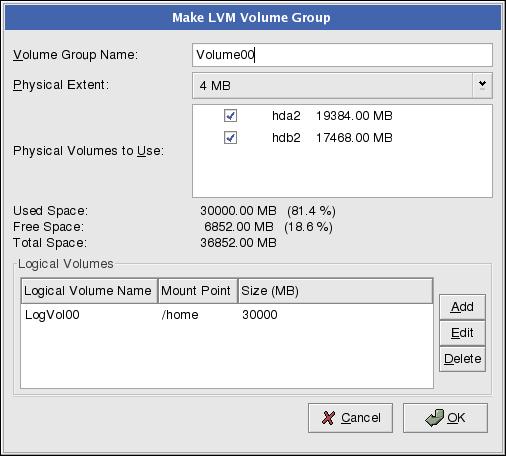
Click the LVM button to collect the physical volumes into volume groups. A volume group is basically a collection of physical volumes. You can have multiple logical volume groups, but a physical volume can only be in one volume group.

Note There is overhead disk space reserved in the logical volume group. The summation of the physical volumes may not equal the size of the volume group; however, the size of the logical volumes shown is correct.
Change the Volume Group Name if desired.
All logical volumes inside the volume group must be allocated in physical extent units. By default, the physical extent is set to 4 MB; thus, logical volume sizes must be divisible by 4 MBs. If you enter a size that is not a unit of 4 MBs, the installation program automatically selects the closest size in units of 4 MBs. It is not recommended that you change this setting.
Select which physical volumes to use for the volume group.
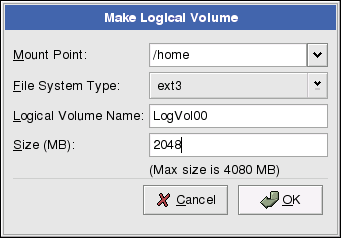
Create logical volumes with mount points such as /home. Remember that /boot can not be a logical volume. To add a logical volume, click the Add button in the Logical Volumes section. A dialog window as shown in Figure 13-3 will appear.
Repeat these steps for each volume group you want to create.
 | Tip |
|---|---|
You may want to leave some free space in the logical volume group so you can expand the logical volumes later. |


